


This article was originally written on the Metered DocuScout website: Gatsby Site Search Plugin
This tutorial will guide you through the process of integrating an AI-powered Site Search Plugin into your Gatsby site in just 5 minutes.
DocuScout's AI-powered Site Search enhances your Gatsby site with instant search capabilities. Users can swiftly find the information they need.
Additionally, the AI-powered chat feature allows users to ask questions in natural language. This chatbot is trained on your site's documentation to provide accurate answers.
Along with the AI powered chat, DocuScout also features instant search to allow users query find information on your site.


This article was originally published on metered blog and if you want to see the search functionality working live you can visit the website
In the above video you can use Docuscout in Action. We have created a very basic Gatsby website and added Docuscout to the website.
But the end of this post you will learn how you can add it to your own Gatsby website. Lets get started
Prerequisites
If you have not already signed up for a DocuScout account, you can sign up here for a free account: Sign up for free
Gatsby website where you want to add the search
Step 1: Create Site in DocuScout
Once you've registered with DocuScout, the next step is to create a site. This site will hold all the searchable content from your Gatsby website.

Click on the "Add Site" button create a new site.

Site Name: Enter your site name, you can enter anything you like.
Home page: Provide the URL of your site home page.
Site Type: Under Site Type, select other.
Then press the Save button to add the site.
Step 2: Load Sitemap
Once your site has been added, you will be taken to the site detail page, here you can specify the Sitemap URL.
The crawler will load all the URLs from the sitemap automatically, if you wish to manually specify the URL you can also do so.
You can click on the "Load URLs from Sitemap" button to scan through all the URL in the sitemap. If you using Gatsby Sitemap plugin the location of your sitemap is your-site-name.com*/sitemap.xml* or your-site-name.com*/sitemap-index.xml*
Try both the URLs and see what works. If your site does not use a sitemap then you can also manually specify the URLs using the "Save URL" button.
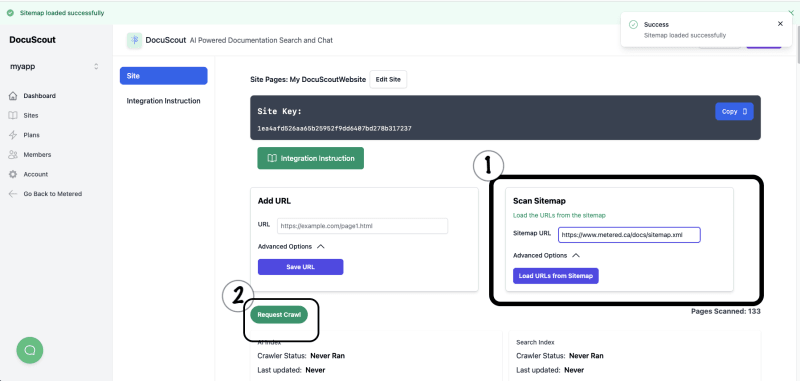
After the sitemap is loaded, click the "Request Crawl" button. This action prompts the crawler to start, scanning all pages to construct our Search and AI Indexes. The Search Index enables instant search capabilities, while the AI Index enhances the AI-driven Chat feature.
Step 3: Integrate the Search Bar in Gatsby
Now let's add the Search bar to your Gatsby site. To add the search bar create a file called search.js under the src/components folder. If you don't have a components folder under your src/ directory then create one.
open the file src/components/search.js and add the following code
import React, { useEffect } from 'react';

const Search = () => {

const SITE_API_KEY = "REPLACE WITH YOUR SITE";


useEffect(() => {
    // Load script
    const script = document.createElement('script');
    script.src = 'https://cdn.metered.ca/docuscout/1.0/docuscout.umd.js';
    script.type = 'text/javascript';
    script.async = true;

    // Load style
    const link = document.createElement('link');
    link.href = 'https://cdn.metered.ca/docuscout/1.0/style.css';
    link.rel = 'stylesheet';
    link.type = 'text/css';

    // Append to document
    document.head.appendChild(script);
    document.head.appendChild(link);

    // Initialize script after load
    script.onload = () => {
        if (window.docuscout) {
            window.docuscout({
                container: document.getElementById("docuscout-search-bar"),
                environment: window,
                siteAPIKey: SITE_API_KEY
            });
        }
    };

    // Cleanup function
    return () => {
        document.head.removeChild(script);
        document.head.removeChild(link);
    };
}, []);

return <div id="docuscout-search-bar" />
};

export default Search;
Make sure to replace the SITE_API_KEY value with your Site API key that is shown in the dashboard, this will link your index with your search bar.
Now you can add the component wherever you want to show the search bar.
for e.g we have added the Search to the homepage page of our basic Gatsby site.
 import * as React from "react";
    import Search from "../components/Search";

    const IndexPage = () => {
        return (
        <main>
            <h1>Welcome to my site</h1>
            <p>
            Very basic gatsby site to showcase Docuscout search.
            </p>

            <Search />
        </main>
        )
    }

    export const Head = () => <title>Home Page</title>

    export default IndexPage;
Step 4: Done!
We have learned how we can add Instant Search and Chat to a Gatsby Website.

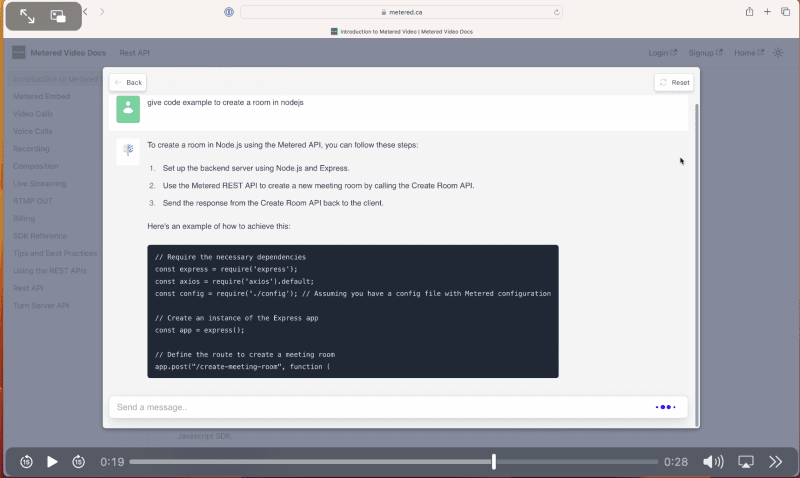
When you click on the Search bar, it will open a modal that will allow you to do instant search.

You can also ask the AI powered Chat which is trained on your Docs questions, and it will find the answers buried in the docs.
Conclusion
We hope this guide has been helpful in integrating Docuscout with your Gatsby site. If you have any questions or need further assistance, please don't hesitate to reach out to our support team.