

Table of contents
- Step 1: Add Chat to your existing Electron Application
- Step 2: Generating code for the chat
- Step 3: Add Chat to your Electron Application
- Step 4: Add Chat to new Electron Application
- Using Chat features with API and SDK
- Adding Chat SDK to the electron application
- Connecting the Chat SDK to the iframe
- Testing the Chat SDK
- Sending Messages to your Electron Chat app using the Chat SDK
- List of commonly used Chat SDK methods that can be used with Electron
- List of commonly used Chat SDK events that can be used with Electron
- List of commonly used Chat API calls that can used with Electron
- A word about Webhooks in Electron
- Implementing Single Sign On to your Electron Chat Application
- Conclusion
This article was originally published on the DeadSimpleChat Blog
In this article, we are going to learn how to build an electron application in easy-to-understand steps.
You can create a new Electron App or Add chat to your existing Electron application.
First, we are going to learn how to add chat to your existing electron application. If you don't have an existing application, you can directly go to step 4 and start from there.
\>New to DeadSimpleChat? It's a turn key chat that you can easily add to your website or App —without any complicated code. For Virtual / Live events, SaaS App, Social Platform, Education, Gaming, Finance Sign Up for Free
Step 1: Add Chat to your existing Electron Application
I have scaffolded an electron application that I am going to add chat to.
It is a basic electron application just a bare-bones "hello world" app.
Here is the index.html file for your reference
<!DOCTYPE html>
<html>
  <head>
    <meta charset="UTF-8">
    <!-- https://developer.mozilla.org/en-US/docs/Web/HTTP/CSP -->
    <meta http-equiv="Content-Security-Policy" content="default-src 'self'">
    <script src="https://cdn.deadsimplechat.com/sdk/1.0/dschatsdk.min.js"></script>
    <title>Hello World!</title>
  </head>
  <body>
    <h1>Hello World!</h1>
    We are using Node.js <span id="node-version"></span>,
    Chromium <span id="chrome-version"></span>,
    and Electron <span id="electron-version"></span>.
  </body>
</html>
and the main.js file
const { app, BrowserWindow } = require('electron')

const createWindow = () => {
    const win = new BrowserWindow({
      width: 800,
      height: 600
    })

    win.loadFile('index.html')
    win.webContents.openDevTools()
  }

  app.whenReady().then(() => {
    win.webContents.openDevTools()
    createWindow()
  })

  app.on('window-all-closed', () => {
    if (process.platform !== 'darwin') app.quit()
  })

  app.whenReady().then(() => {
    createWindow()

    app.on('activate', () => {
      if (BrowserWindow.getAllWindows().length === 0) createWindow()
    })
  })
To add chat to your electron application you will need a chat provider.
go to deadsimplechat.com and create a free account there by clicking on the Get Started button.
Step 2: Generating code for the chat
Once you have created an account on the DeadSimpleChat website you will land up in the dashboard section
there click on the create a chat room button to create a new chat room.
You will be asked to name the chat room and there would be the ability to enable features that you need in the chat
There will be options for UI customization and language translation as well.
After that, you will land in the embed section of the chat.
Here you will see the embed code for the chat. Copy that code
Alternatively, you can reach the embed code by going to
Dashboard -> Chat rooms -> Embed code
Here you can customize the size of the chat that you add to the electron application.
Now, let's move on to the next step of adding this chat to your electron application
Step 3: Add Chat to your Electron Application
In the index.html files paste the iframe tag inside the body tag where you want the chat to appear.
and in the content security meta tag add the following code:
original content security meta tag:
<meta http-equiv="Content-Security-Policy" content="default-src 'self'">
code added to allow DeadSimpleChat content security meta tag
<meta http-equiv="Content-Security-Policy" content="frame-src https://deadsimplechat.com/CGOC0byXC; default-src 'self'; script-src https://cdn.deadsimplechat.com/sdk/1.0/dschatsdk.min.js 'unsafe-inline'">
I have added the iframe tag inside the body tag where I want the chat to appear and I have updated the content security meta tag to allow the deadsimplechat website inside the Electron application.
Here is how the full code looks like:
<!DOCTYPE html>
<html>
  <head>
    <meta charset="UTF-8">
    <!-- https://developer.mozilla.org/en-US/docs/Web/HTTP/CSP -->
    <meta http-equiv="Content-Security-Policy" content="frame-src https://deadsimplechat.com/CGOC0byXC; default-src 'self'; script-src https://cdn.deadsimplechat.com/sdk/1.0/dschatsdk.min.js 'unsafe-inline'">
    <script src="https://cdn.deadsimplechat.com/sdk/1.0/dschatsdk.min.js"></script>
    <title>Hello World!</title>
  </head>
  <body>
    <h1>Hello World!</h1>
    We are using Node.js <span id="node-version"></span>,
    Chromium <span id="chrome-version"></span>,
    and Electron <span id="electron-version"></span>.

    <iframe id="chat-frame" src="https://deadsimplechat.com/CGOC0byXC" width="100%" height="600px"></iframe>

    <button id="logout-btn">Logout</button>
<script>

  (async () => {
    const sdk = new DSChatSDK("CGOC0byXC", "chat-frame", "pub_7172586270477a656a3863587a594f46566e736839307737544b532d3463484c4e524b5743676b7733336d5151767a4b")
    // Call the connect method to connect the SDK to the Chat iFrame.
    await sdk.connect().then(
      () => {
        document.getElementById("logout-btn").addEventListener("click", function() {
          sdk.logout();
        });
      }
    );
})();

</script>
  </body>
</html>
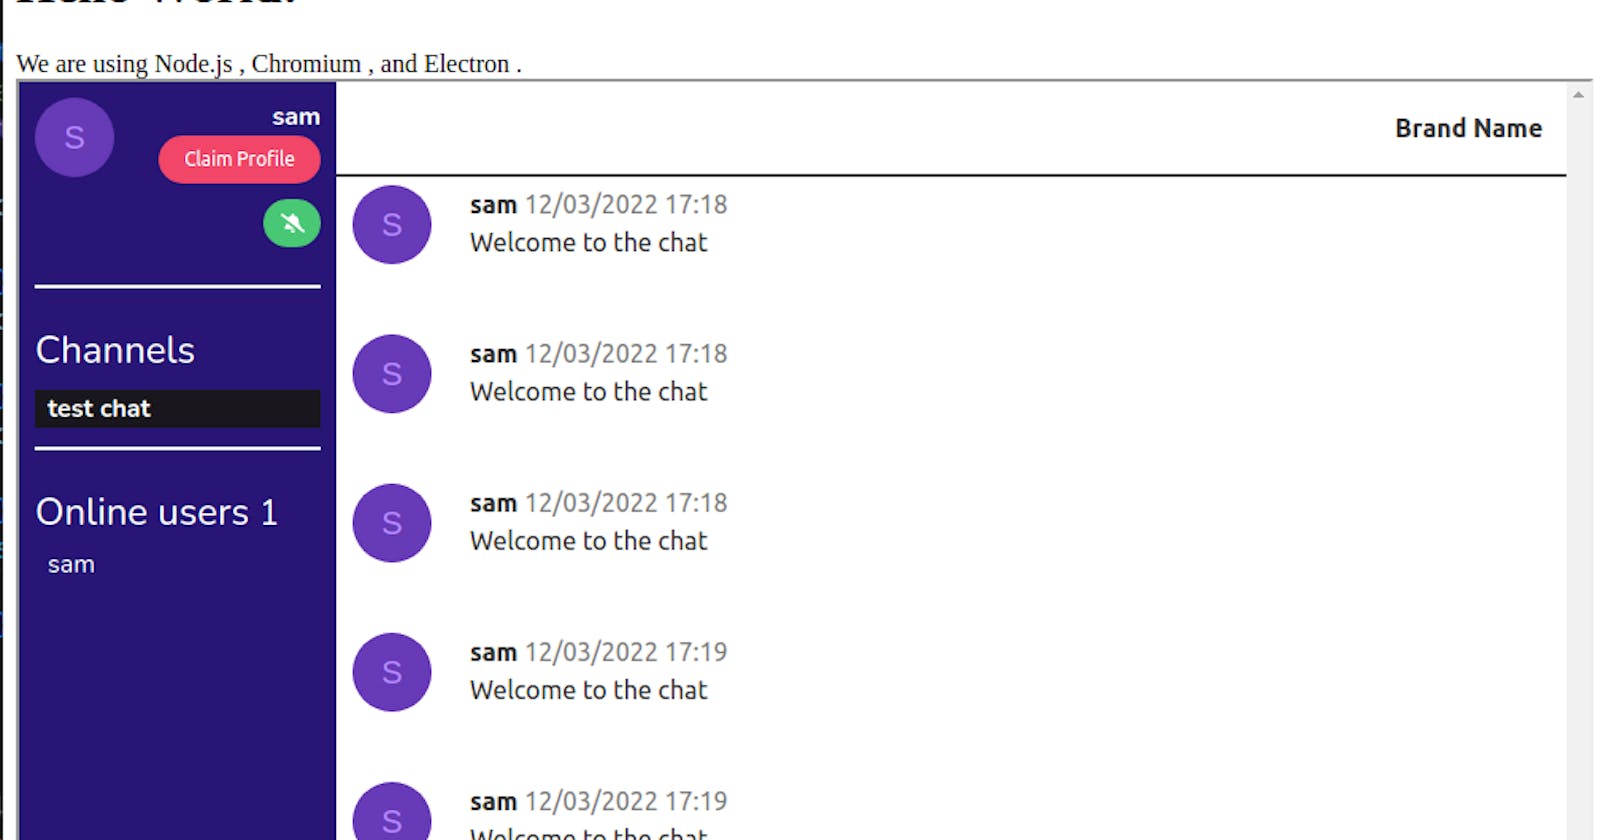
and here is how the final application looks like :
Step 4: Add Chat to new Electron Application
To add chat to a new electron application first we need to create a new electron application
type the following code to scaffold a new electron application
mkdir my-electron-app && cd my-electron-app
npm init
this will create a new directory called the my-electron-application and cd into that directory
npm init command will initialize a new project for you.
Then install the electron by typing the following command
npm install --save-dev-electron
type the npm run start command to start the electron application
run the node -v and npm -v commands to check which version of node and npm you are using. We recommend using the latest LTS versions when starting out a new application
Using Chat features with API and SDK
Now that we have added chat to the new electron application and also demonstrated how we can add chat to an existing electron application now is the time to connect the API and SDK of the chat to the electron application
Adding Chat SDK to the electron application
Paste the below code to import the chat to the electron application in your index.html file
<script src="https://cdn.deadsimplechat.com/sdk/1.0/dschatsdk.min.js"></script>
We already added the code to allow the SDK from the electron application in the content security meta tag. If you have not done so add the following meta tag and delete the old one
<meta http-equiv="Content-Security-Policy" content="frame-src https://deadsimplechat.com/CGOC0byXC; default-src 'self'; script-src https://cdn.deadsimplechat.com/sdk/1.0/dschatsdk.min.js 'unsafe-inline'">
This will allow the electron app to communicate with the SDK
Connecting the Chat SDK to the iframe
We have imported the SDK and we need to initialize the SDK. This process is quite simple you need to call the DSChatSDK constructor that accepts the following parameters:
Chat RoomID
ID of the iframe
Public API Key
The Public API key is available Dashboard -> Developer
Create a script tag in the index.html and add the following code to connect the chat to the SDK
(async () => {
    // DSChatSDK construction accepts two parameters:
    // 1. Chat Room Id
    // 2. ID of the iFrame tag
    // 3. Dead Simple Chat Public API Key.
    const sdk = new DSChatSDK("sq94k9OZV", "chat-frame", "pub_5738506b4e495f744e74556e666a644a68766f4b69767753596239666e473533271517a485775656f354978795830")
    // Call the connect method to connect the SDK to the Chat iFrame.
    await sdk.connect();
});
This will initialize the SDK and connect it with the chat iframe
Let us now test that we have successfuly initialized the connection by creating a simple logout button and calling the SDKs logout function to log the user out of the chat
Testing the Chat SDK
In the body tag create a button with the id logout-btn and write the following code in the the script tag which has the SDK
  (async () => {
    const sdk = new DSChatSDK("CGOC0byXC", "chat-frame", "pub_7172586270477a656a3863587a594f46566e736839307737544b532d3463484c4e524b5743676b7733336d5151767a4b")
    // Call the connect method to connect the SDK to the Chat iFrame.
    await sdk.connect().then(
      () => {
        document.getElementById("logout-btn").addEventListener("click", function() {
          sdk.logout();
        });
      }
    );
})();
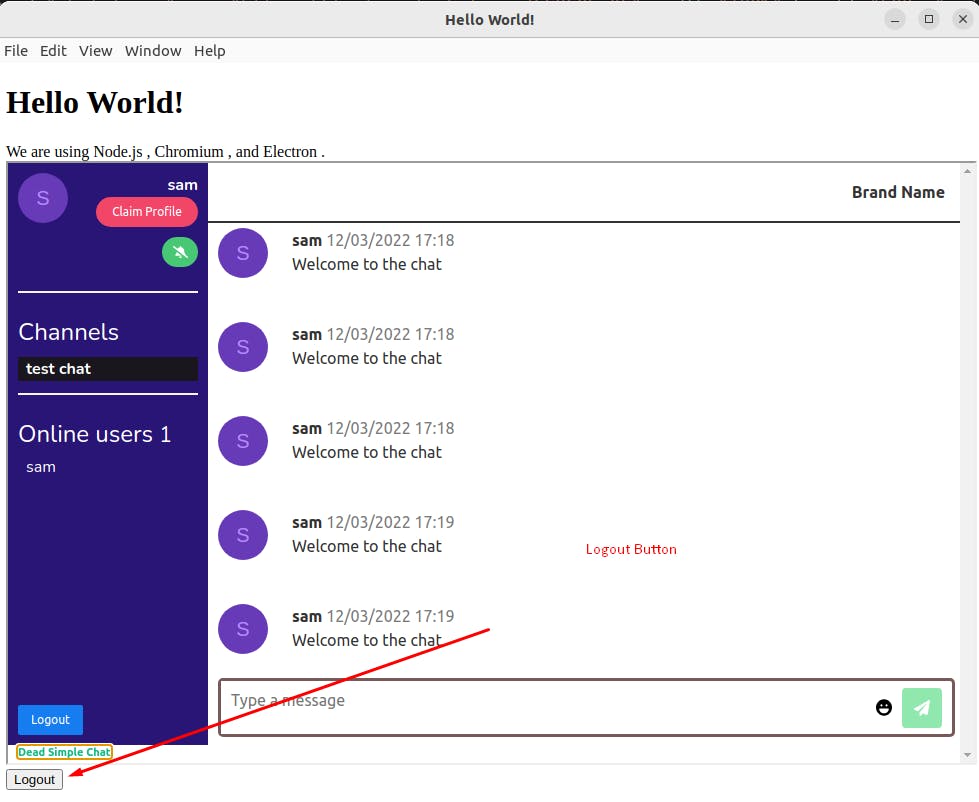
Here we are calling the SDKs logout function when the logout button is clicked. The code for the logout button looks like
<button id="logout-btn">Logout</button>
and the index.html file looks like:
<!DOCTYPE html>
<html>
  <head>
    <meta charset="UTF-8">
    <!-- https://developer.mozilla.org/en-US/docs/Web/HTTP/CSP -->
    <meta http-equiv="Content-Security-Policy" content="frame-src https://deadsimplechat.com/CGOC0byXC; default-src 'self'; script-src https://cdn.deadsimplechat.com/sdk/1.0/dschatsdk.min.js 'unsafe-inline'">
    <script src="https://cdn.deadsimplechat.com/sdk/1.0/dschatsdk.min.js"></script>
    <title>Hello World!</title>
  </head>
  <body>
    <h1>Hello World!</h1>
    We are using Node.js <span id="node-version"></span>,
    Chromium <span id="chrome-version"></span>,
    and Electron <span id="electron-version"></span>.

    <iframe id="chat-frame" src="https://deadsimplechat.com/CGOC0byXC" width="100%" height="600px"></iframe>

    <button id="logout-btn">Logout</button>
<script>

  (async () => {
    const sdk = new DSChatSDK("CGOC0byXC", "chat-frame", "pub_7172586270477a656a3863587a594f46566e736839307737544b532d3463484c4e524b5743676b7733336d5151767a4b")
    // Call the connect method to connect the SDK to the Chat iFrame.
    await sdk.connect().then(
      () => {
        document.getElementById("logout-btn").addEventListener("click", function() {
          sdk.logout();
        });
      }
    );
})();

</script>
  </body>
</html>
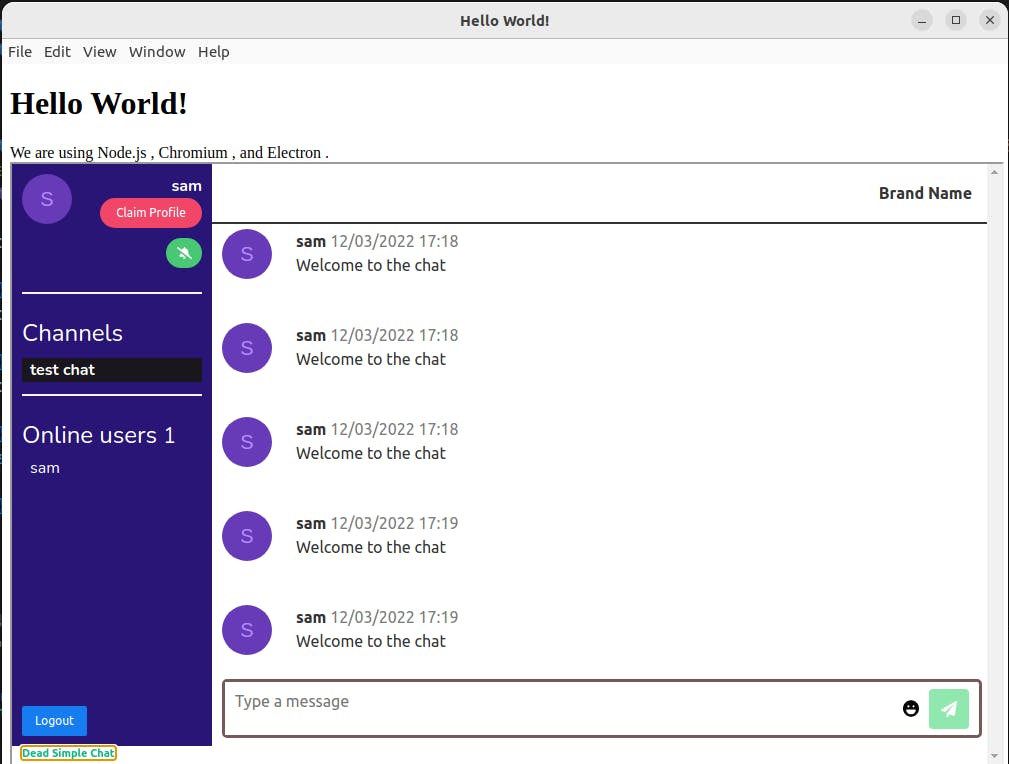
Here is how your electron chat application looks like:
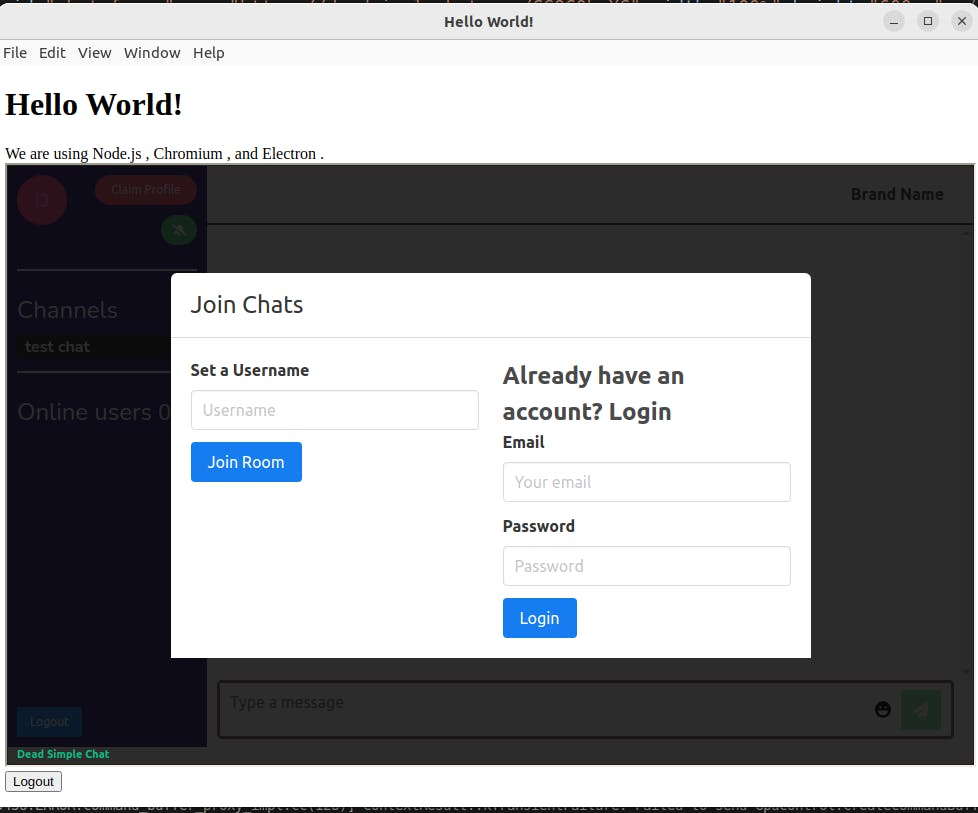
When the logout button is clicked the user is locked out of the chat room
There are a whole host of SDK methods and events available. We will be learning about a few of them below.
For the complete documentation you can refer to the developer docs
Sending Messages to your Electron Chat app using the Chat SDK
To give you another example of how you can use the chat SDK in your electron application, We will be sending a chat message to the electron app using the sdk
to send the message we will be using the send message method of the chat sdk
here is the documentation for the send message method
For the purposes of this example we will send sending a hard coded "Welcome to the chat" Message, but in the production app you can send anything you want
Let us create a button that when clicked will send the message to the chat room.
The button will call the sdk sendMessage method.
We have created the button and gave it the id sendMessage-btn
<button id="sendMessage-btn">Welcome to the chat</button>
Welcome to the chat message
Now let us call the sendMessage function of the sdk in the script tag. the code looks like this:
  (async () => {
    const sdk = new DSChatSDK("CGOC0byXC", "chat-frame", "pub_7172586270477a656a3863587a594f46566e736839307737544b532d3463484c4e524b5743676b7733336d5151767a4b")
    // Call the connect method to connect the SDK to the Chat iFrame.
    await sdk.connect().then(
      () => {
        document.getElementById("logout-btn").addEventListener("click", function() {
          sdk.logout();
        });
        document.getElementById("sendMessage-btn").addEventListener("click", function() {
          sdk.sendMessage('Welcome to the chat');
        });
      }
    );
})();
and this is how the electron application looks like:
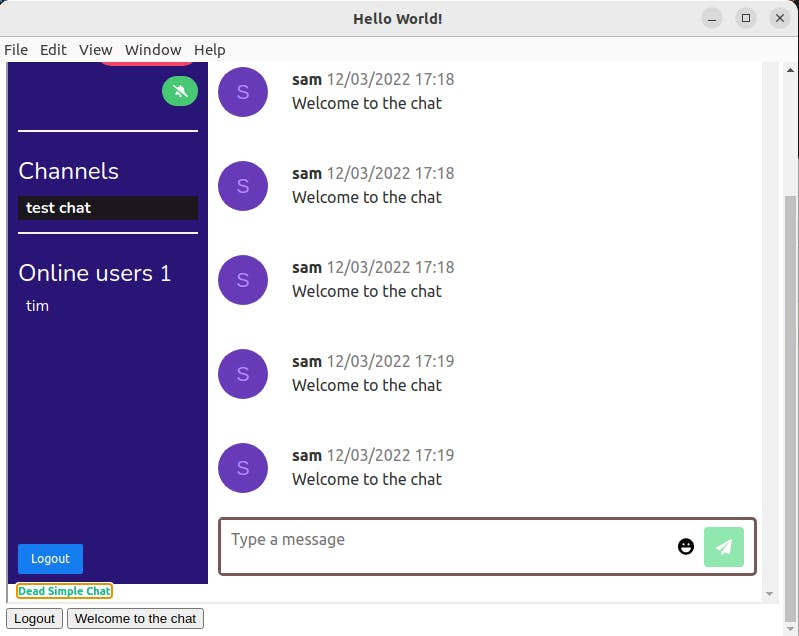
When you click the Welcome to the chat button a message is sent to the chat room.
Hence we have demonstrated how to send a message to the electron chat application with DeadSimpleChat SDK
List of commonly used Chat SDK methods that can be used with Electron
Here is the list of commonly used SDK methods. For a complete list of methods refer to the Chat SDK documentation
joinRoom(Options)
Logout
SendMessage
sendPrivateMessage
getMessage
replyMessage
getOnlineUsers
banIp
banUser
joinRoom(Options): Using the joinRoom method you can enter a user into the chat room. The joinRoom metho can be callled using one of the three optional parameters these are 1. username, 2. accessToken, 3. email.
You can also specify the optional profile picture and custom metadata for the user
2. Logout: As we have demonstrated above the logout method is used to log the user out of the chat room
3**.** SendMessage: We have also used this method in the demo above. You can send messages to the chat room using the sendMessage
4. SendPrivateMessage: Call this method to send private 1-1 message to a user. This method can only be called if 1-1 messaging is enabled in the chat room
5. getMessages: You can call this method to get messages from the chat room. You can download the messages from the chat room by calling this method
6. replyMessage: You can reply to a specific message by calling this method
7. getOnlineUsers: You can get the number of users that are online by calling this method
8. banIp: you can ban an IP address from the chat. The users with that specific IP address will not be able to enter the chat
9. banUser: ban a specific user from the chat room.
List of commonly used Chat SDK events that can be used with Electron
Events are triggered when something happens in the chat room. for example if you like to know whenever a message is sent in the chat room.
You can listen to the message event and write the code to do something when a message is sent in the chat room
The code for the message event is
frame1.on("message", (message) => {
    console.log("new message", message);
});
example of a Chat SDK event used in Electron application
Let us listen to the message event in the electron application and send and alert message whenever a message is sent in the chat room
Let us go back to the electron chat application that we have been working on.
if we send a message to our electron chat app an alert message should appear letting us know that a message has appeared in the chat room
Write the below code in the script where we connect
   sdk.on("message",(message)=>{
          alert("new message", message);
        })
The index.html looks like this
<!DOCTYPE html>
<html>
  <head>
    <meta charset="UTF-8">
    <!-- https://developer.mozilla.org/en-US/docs/Web/HTTP/CSP -->
    <meta http-equiv="Content-Security-Policy" content="frame-src https://deadsimplechat.com/CGOC0byXC; default-src 'self'; script-src https://cdn.deadsimplechat.com/sdk/1.0/dschatsdk.min.js 'unsafe-inline'">
    <script src="https://cdn.deadsimplechat.com/sdk/1.0/dschatsdk.min.js"></script>
    <title>Hello World!</title>
  </head>
  <body>
    <h1>Hello World!</h1>
    We are using Node.js <span id="node-version"></span>,
    Chromium <span id="chrome-version"></span>,
    and Electron <span id="electron-version"></span>.

    <iframe id="chat-frame" src="https://deadsimplechat.com/CGOC0byXC" width="100%" height="600px"></iframe>

    <button id="logout-btn">Logout</button>
    <button id="sendMessage-btn">Welcome to the chat</button>
<script>

  (async () => {
    const sdk = new DSChatSDK("CGOC0byXC", "chat-frame", "pub_7172586270477a656a3863587a594f46566e736839307737544b532d3463484c4e524b5743676b7733336d5151767a4b")
    // Call the connect method to connect the SDK to the Chat iFrame.
    await sdk.connect().then(
      () => {
        document.getElementById("logout-btn").addEventListener("click", function() {
          sdk.logout();
        });
        document.getElementById("sendMessage-btn").addEventListener("click", function() {
          sdk.sendMessage('Welcome to the chat');
        });
        document.getElementById("sendMessage-btn").addEventListener("click", function() {
          sdk.sendMessage('Welcome to the chat');
        });
        sdk.on("message",(message)=>{
          alert("new message", message);
        })
      }
    );
})();

</script>
  </body>
</html>
Now we are listening on the message event of the sdk and whenever a message is sent into the chat room we are triggering an alert with the message inside it.
You can try sending a message in the chat room and see the alert come in
Here are some of the important events from the DeadSimpleChat SDK. For a complete list of events refer to the chat SDK events documentation
message: Message event is triggered when someone sends a message in the chat room.
messageHistory: MessageHistory event is triggered when someone joins a chat room. The messageHistory event containes the last 18 messages that are present in the chat room
messageDeleted: messageDeleted event is triggered when a message is deleted in the chat room. It contains the deleted message and also the id of the user and the customer
roomLimitreached: roomLimitReached is triggered when the capacity of the room is reached.
notAuthorized: when something unauthorized happens the notAuthorized event is triggered
messageLiked: when a message is liked the messageLike event is triggered. It contains the contents of the message which is liked and id of the user who liked the message and also who sent the message
conversationCreated: When a new conversation is created. The conversationCreated method is triggered
youAreBanned: the event is triggered when the user is banned
channelCreated: When a channel is created the channelCreated method is triggered
List of commonly used Chat API calls that can used with Electron
There are a whole host of Chat API available to use with DeadSimpleChat and Electron.
Here are a list of important Chat APIs for a complete list of Chat APIs refer to the REST API documentation of DeadSimpleChat
There are six sections of chat api
- Chat room api: The chat room API contains a list of APIs related to the chat rooms. These APIs include:
Get All Chat rooms
Get a specific chat room
delete a chat room
create a chat room
update chat room
eject all users from chat room'
turn off chat room
turn on chat room
and many others
- Channels API
Channels API are specific to channels. Channels are chat rooms inside of chat rooms, they are optional.
You can enable them if you need sub rooms for specific topics and audiences inside a chat room
3. Presence API
The Presence API is used for fetching the number of users that are online at any time.
4. User and Moderator API
With users and Moderator API, you can create users with specific usernames and add them to specific chat that they need to be in
You can create users on the fly, update and delete them
You can also create moderators and assign them to specific chat rooms with API
The Moderator and Users API include the following APIS
Create-user
Create-Moderator
update-user
update-moderator
validate-access-token
invalidate-access-token
and many more
For a complete list of user and moderator api refer to the user and moderator api documentation
5. Messages API
You can send messages to the chat room using the messages api. You can send
6. Export API
Using the Export API you can export the chat messages and files and images.
A word about Webhooks in Electron
Webhooks are automated messages that are sent when something happens. With the help of DeadSimpleChat Webhooks you can have a deep integration with any app out there
You can integrate DeadSimpleChat with any other app like slack, trello, email or your app
An example of using webhooks would be: use webhook to send a message to slack when someone joins a chat room
Webhooks will send a message to a url when something happens in the chat
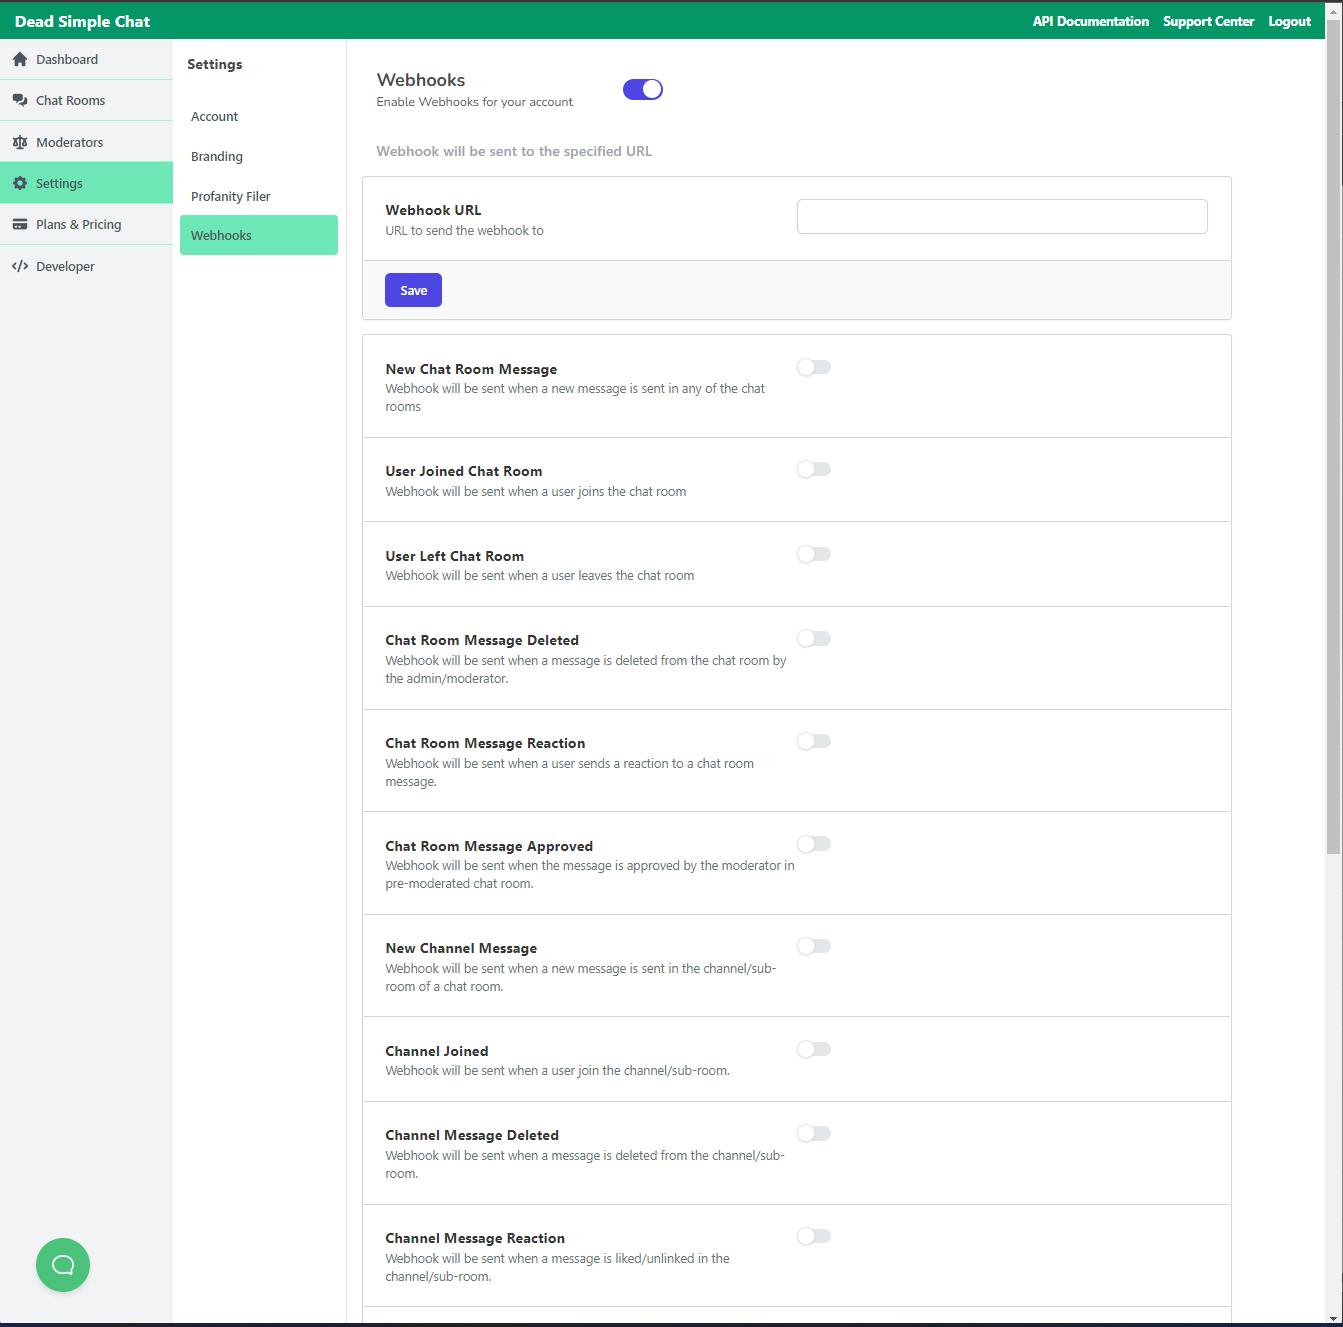
You can enable the webhooks in
Chat -> Dashboard -> Settings -> Webhooks
Webhooks are sent as an HTTP POST request.
Implementing Single Sign On to your Electron Chat Application
Using the Single Sign On functionality you can automatically login users into the chat room that are on your website or app.
There are two types Single Sign On available with DeadSimpleChat
Basic Single Sign On
Advanced Sigle Sign On
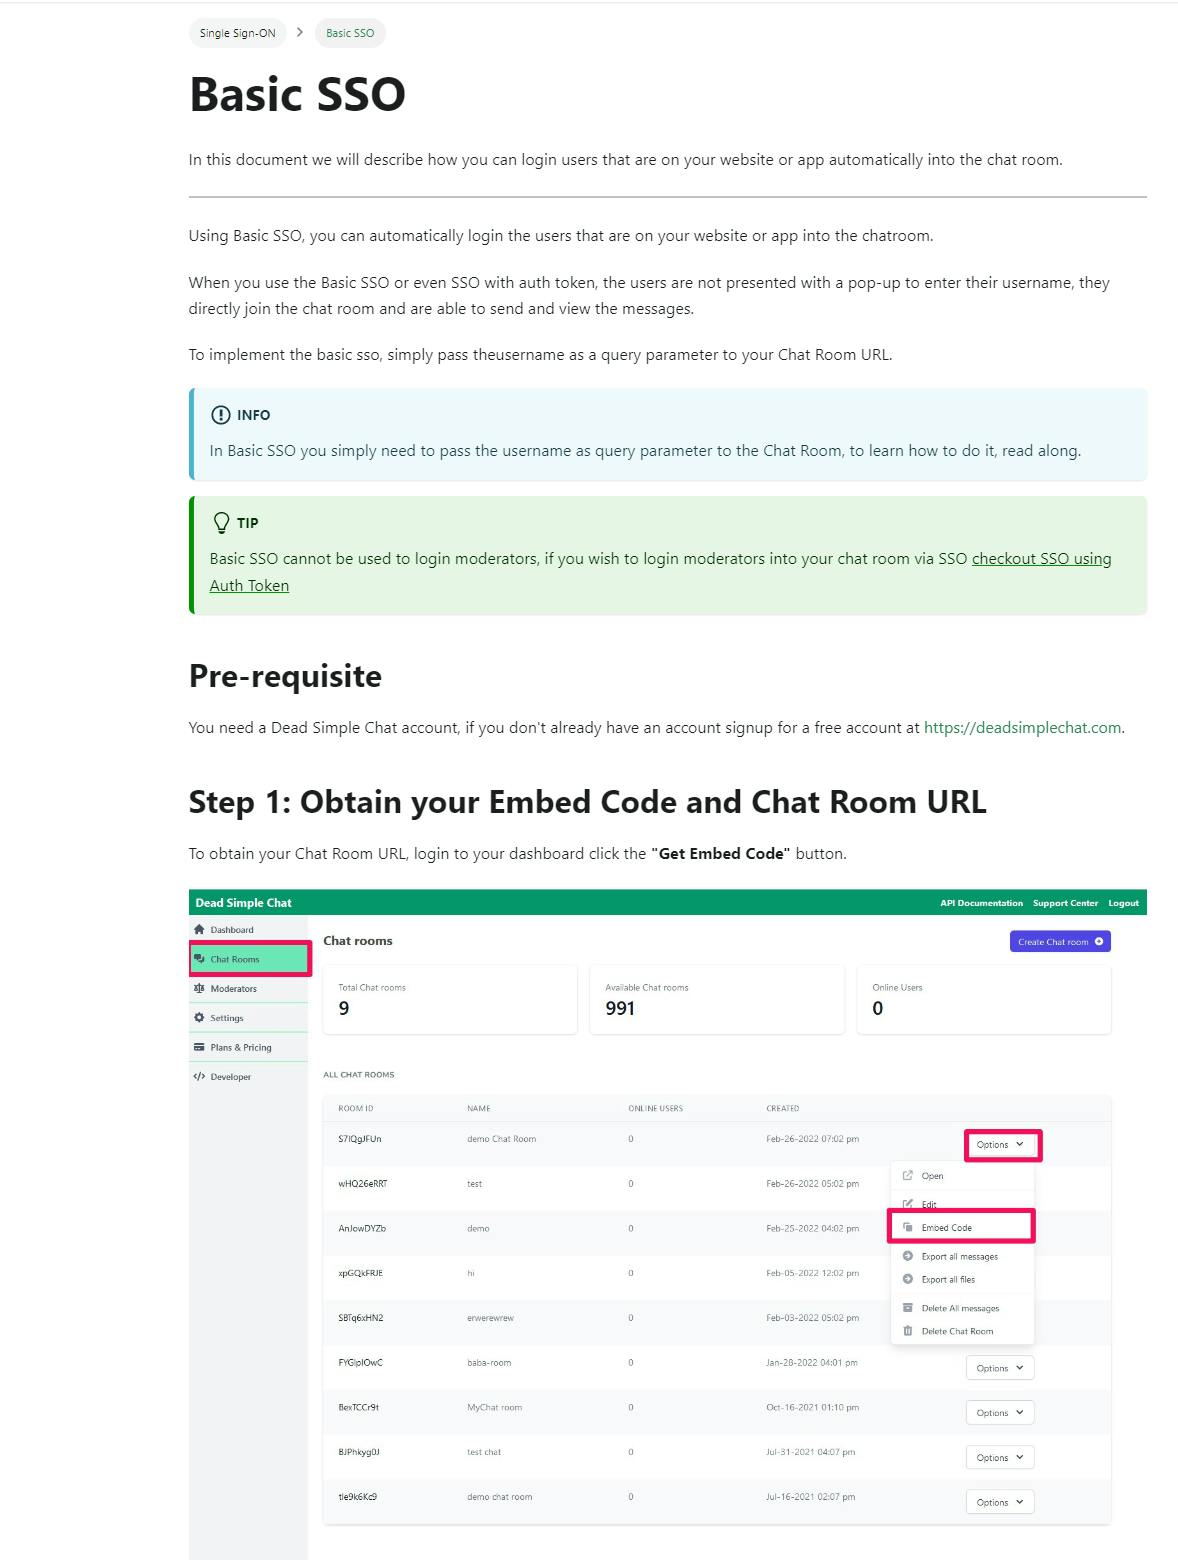
Basic SSO is easy to implement. With basic SSO logining in a user is as simple as passing the username as a query parameter.
One thing to note is that you cannot login moderators using the basic SSO
Advantages of Basic SSO:
Easy to implement
Does not require coding knowledge
Disadvantages of Basic SSO
Less secure than Advanced SSO
Cannot login Moderators using basic SSO
If you want to learn more about how to implement basic SSO here is the tutorial
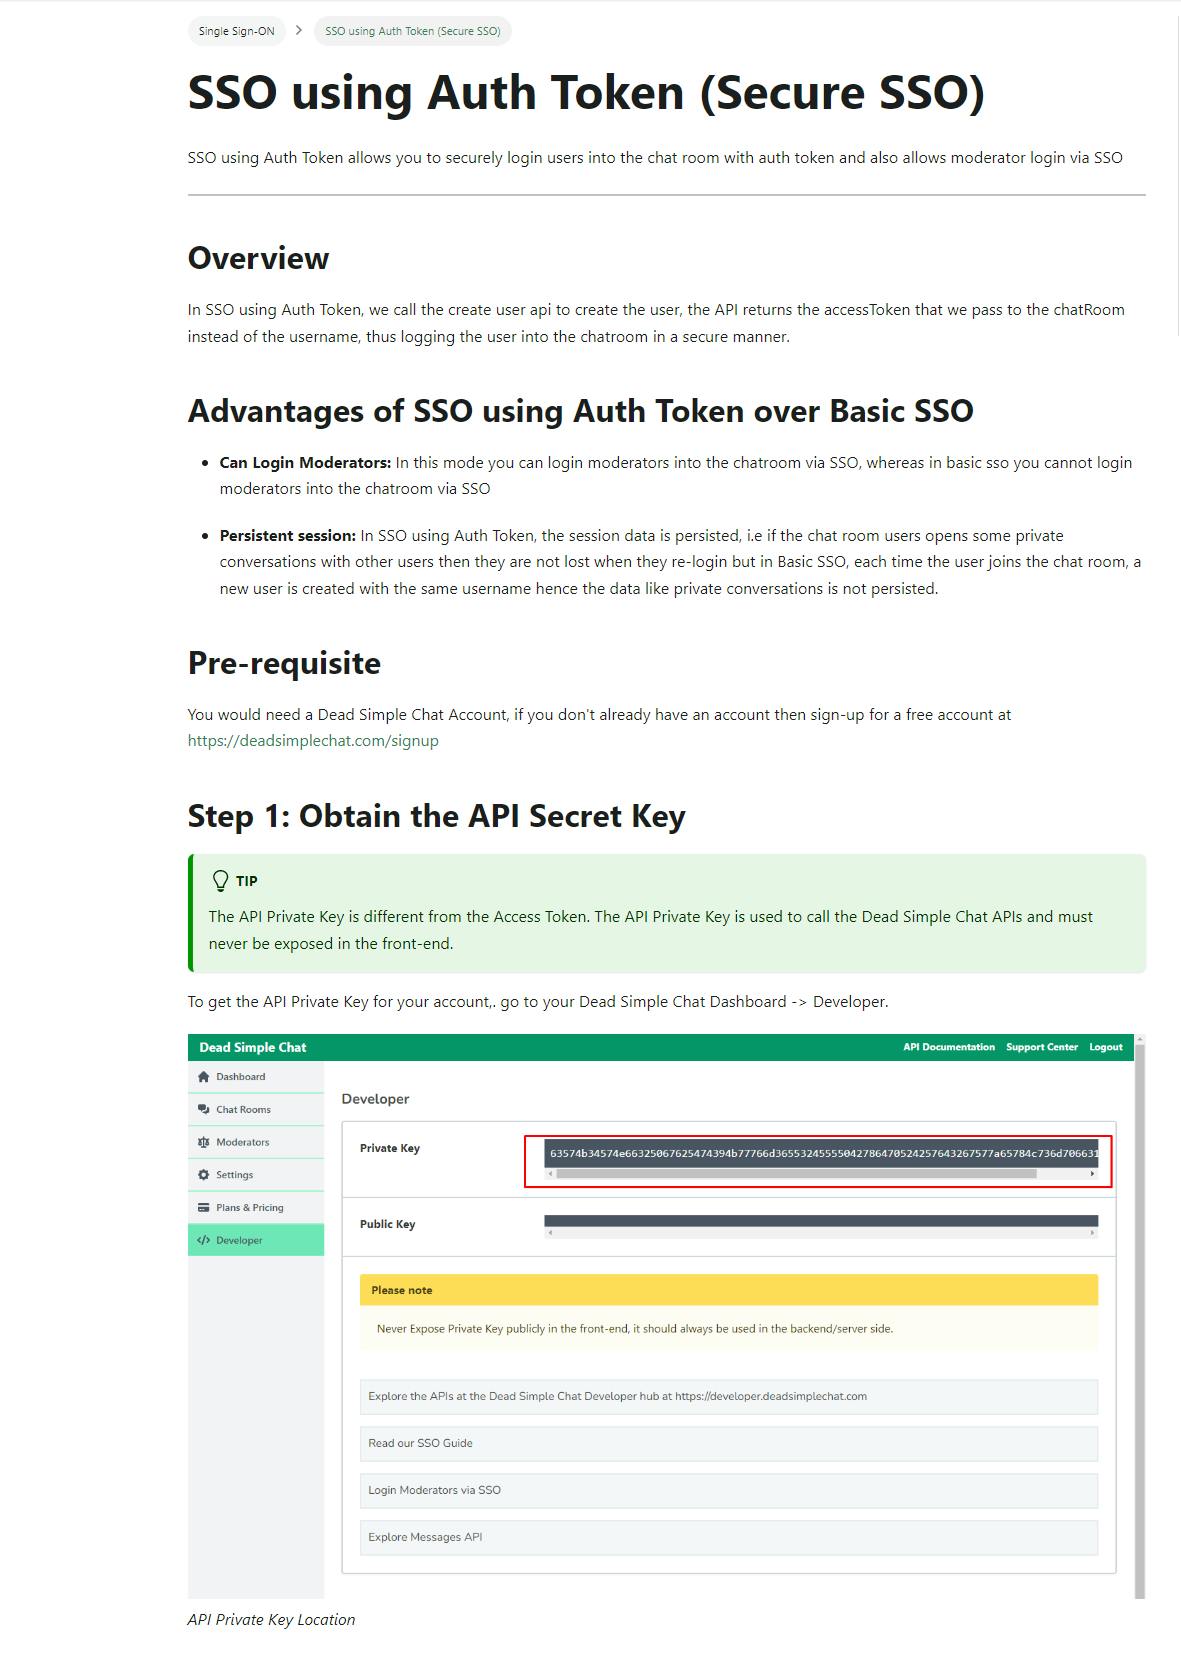
Advanced SSO is more secure by require more coding skills to implement.
Advanced SSO is secure because it requires access Token to login the user into the chat room.
Advantages of Advanced SSO
More Secure than Basic SSO
Can login Moderators using Advanced SSO
Requires Access Token to login
Disadvantages to Advanced SSO
- Requires a bit of coding knowledge to implement
If you want to learn more about how to implement Advanced SSO here is the tutorial
Conclusion
Here is the Electron Chat app code on Github
In this article we have learnt how to Electron desktop chat app using Chat SDK and API from DeadSimpleChat.
Having your own desktop application is awesome, you dont need to depend on third party solutions and can own all the data that is in the chat platform.
With electron you can publish the chat app for all the different platforms like Mac, Windows and linux.
If you have any questions / concerns let us know at support[at]deadsimplechat.com